I don't use my reds enough. This tutorial hopes to break that habit! I also felt like doing something kinda vampy instead of the typical "Valentine's Day" looks that are popping up out there around this time of year. ;) If you'd like to find out how I achieved this look:

Please keep on reading!
First, as always, make sure to have all of your supplies handy!

Lots of goodies here! Urban Decay Lush Lash Mascara, NYX Eyeshadow Base in "White", Madd Style Cosmetics "Optimus Primer", Urban Decay pencils in "Yeyo" and "Zero", Madd Style Cosmetics "Awesome Sauce", Madd Style Cosmetics piggies (clockwise from the top left): The Girl Who Waited, Double Rainbow, Dirty Chai, Kiss with a Fist and Queen of Hearts, big eyeshadow brush, small crease brush, flat rounded shadow/concealer brush, pencil brush, short shader, second pencil brush, bent eyeliner brush, Gabriel Color shadow in "Bone" and Lush "Independent" eyeliner!
You always want to start with clean eyes. Mine had some specks from my makeup last night that just didn't want to come off...so do a better job that I did with cleaning off your makeup, your skin will thank you for it! To keep your shadows looking opaque and to help them stay in place all day, you want to begin by applying a primer to your clean lid. I apply about this much and then I blend it out using my ring finger. I blend it out evenly over the whole eyelid and then blend up into the crease and toward the brow. Whatever is left on my finger I bring around through the tear duct area and along the lower lash line.

Next comes your base! Putting a white base on will help "blank" out the canvas of your lid. Using white will also help your colours "pop" even more! Just like the primer, I apply it to the center of my lid and then blend it out evenly over the whole lid and blend it up into the crease.

After these two steps, your eye is prepped and ready for the some colour!

To start out, take a "bone" coloured shadow and apply that under your brow and in the crease area. I find that applying a base colour like this helps the crease colour to blend a bit more easily and that is a good thing when you're going to use a matte in the crease (mattes can be a bit trickier to blend).

Taking a small crease brush, dip it into MSC's "The Girl Who Waited" (a super pretty matte coral pink). Swirl the brush in the lid of the piggie to help disperse the colour evenly through all of the bristles of the brush. Keeping your eye open and starting at the outer corner of your eye, you're going to sweep this colour on throughout the entire crease area. Keeping your eye open (if you have hooded or semi hooded lids) will ensure that the colour is visible when your eye is open. This will also help you to make sure you don't blend it up too far toward your eyebrow!

You want to focus this colour on the outer portion of the crease and then fade it in toward the inner part of the crease. You also want to blend this colour up and out at the outer part of the crease (up toward the end of your eyebrow). In the below picture you can see how the natural "crease" of my eye is not how low I place my colours. Because of my semi-hooded lids, I have to bring my crease colours up a bit higher so they're visible when my eye is open.

Next, taking a pencil brush, dip it into MSC's "Double Rainbow" (a pretty soft black with multi-coloured glitter) and apply this in the deeper part of your crease. The pencil brush here will give you the control you need so you don't end up with this colour where it doesn't belong! Applying this colour here will help you to have a bit more definition in your crease and laying it down now gets a darker base in the crease for later on.

Bring this colour in all the way to the inner crease.

Switching back to the small crease brush from earlier, blend this colour out! Don't be shy at this step. It's okay if you lose some of the glitter in the colour as well as it's going to be reapplying it a bit later on. Be careful not to blend this up over top of The Girl Who Waited--you want to keep this focused to the deepest part of your crease. At the outer corner of the crease, bring it up and out a bit more (just like with The Girl Who Waited) but still keep it down lower than the pink that was applied before.

After blending, you should have something like this:

Now for some Awesome Sauce! Awesome Sauce is a foiling medium and I wanted to bring it out for this look to help the red on the lid really stand out. It has a dual purpose though as it also helps the glitter in the red to "stick" to your lid a bit better! Yay for two things happening with one product! As you see on the right--you just need the teeniest amount!

Apply this all over the mobile part of the lid. Pat it on evenly. Try to keep your eye closed for a twenty seconds while the product dries and gets a bit tacky.

Taking a flat shadow/concealer brush, dip it into MSC's "Queen of Hearts" (a super awesome orange based red--I paired it with The Girl Who Waited because they both pull orange (rather than blue)) and press the brush into the lid of the piggie to help prevent fallout and to make sure the the colour is evenly dispersed among the bristles.

Press this colour all over the mobile part of the lid.

Then, using the same flat shadow brush, with whatever is left on the brush do "flicking" motions at the top edge of the colour to help blend it into and over the Double Rainbow. Do this motion gently so the colour is controlled while you're blending it up and out into the crease.

To help re-darken up the crease, dip the crease brush back into Double Rainbow and apply this colour to the outer part of the crease. Blend it in slightly throughout the rest of the crease, but concentrate it to that outer part of the crease.

At this point, you should have something like this happening:

Now for the brow highlight! Because the crease/transition colour is a matte, I decided to do a sparkly brow highlight. I know, I know. But what about Birfday Suit?!! It's okay, we're using the glittery/shimmery version of that! Dirty Chai! Using a short shader brush, start by putting this colour right under the highest arch of the eyebrow then blend it out under the whole brow. Bring this colour into the inner part of the crease/duct area as well to help ensure this area is nicely blended.


Taking the pencil brush that is already dirty, dip it back into Double Rainbow and apply this over the white pencil. At the outer part of the eye make sure to connect this up to the outer part of the crease.

Since this is a vampy look, I chose to line my upper and lower waterlines with a black eyeliner pencil.

Switching to a clean pencil brush, dip it into MSC's "Kiss with a Fist" (or any sparkly white or a white with a pink duochrome) and apply this in the tear duct area to help brighten up the whole look.

Do a small winged liner next! Start by applying a thin-ish line along the entire base of your upper lashes. Then, at the outer corner, make an angled line that follows the angle of your lower lash line (imagine that it continued to go up to meet the bottom of your eyebrow). Lastly, starting at the outer tip of that angled line, bring the liner in in a triangle shape. Fill in the triangle and make sure the wing meets up with the base of lash line in a smooth line.

Apply some mascara to your top and bottom lashes..and you're done!

I decided to slap on some accent/half false lashes to finish off the look, but this is optional! I used Ardell's #305.
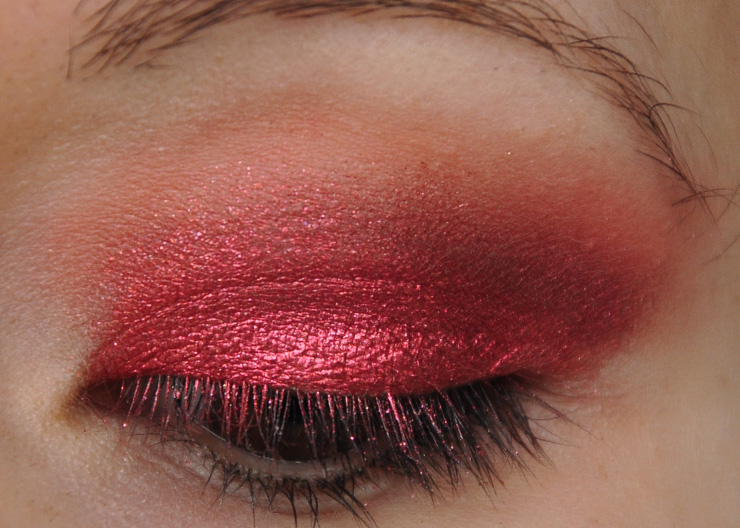
Here's a slew of pictures of the final look!


I used a flash here so you could see how glittery/shimmery the whole look is in real life! :)
Thank you so much for dropping by to read this tutorial. I hope you enjoyed it and that you found it useful! If you have any additional questions please let me know in a comment!
Also, as always, if you have any requests for future looks you'd like to see me try out or any specific MSC colours you'd like to see me use, let me know! :)
No comments:
Post a Comment